📑 Table of Contents ▶
- Salted Caramel Lava Cupcakes
- Mastering Salted Caramel Lava Cupcakes
- Fundamentals
- Preparation/Setup
- Crafting the Perfect Lava Cake Experience
- Technique
- Tips and Tricks
- Elevating Your Baking Game
- Perfecting Results
- Troubleshooting and Variations
- Serving and Storing Your Creations
- Serving and Presentation
- Pairings and Storage
- Conclusion
- FAQs – Salted Caramel Lava Cupcakes
- Related posts:
- No Bake Caramel Rolo Cheesecake: How to Indulge Guilt-Free
- Honey Peach Cream Cheese Cupcakes: The Best Recipe for a Sweet Treat
- LEMON BLUEBERRY BUNDT CAKE
Emma here, sharing my passion for baking and the delightful world of salted caramel lava cupcakes. These cupcakes hold a special place in my heart and kitchen. The first time I made them, I was captivated by their rich, molten centers and the irresistible blend of chocolate and salted caramel.
Every time I bake these salted caramel lava cupcakes, I’m reminded of family gatherings where these decadent treats quickly became the star. The combination of velvety chocolate and gooey salted caramel creates a symphony of flavors that delights everyone. It’s moments like these that fuel my love for creating recipes that bring people together.
As you embark on this baking adventure, you’ll find that these salted caramel lava cupcakes are surprisingly easy to make, yet incredibly rewarding. The joy of watching the lava-like caramel flow from the center is unmatched. Join me in uncovering the secrets to perfecting this timeless dessert, and let’s create something truly magical.
Now, let’s dive into the world of salted caramel lava cupcakes, exploring the fundamentals and preparation techniques that will make your baking experience enjoyable and successful.
Print
Salted Caramel Lava Cupcakes
- Total Time: 29 minutes
- Yield: 5 servings 1x
Description
Indulge in the decadent goodness of Salted Caramel Lava Cupcakes. Learn how to create these irresistible treats that ooze with gooey caramel filling. Perfect for any dessert lover!
Ingredients
- 1 cup (200g) granulated sugar
- 6 tablespoons (80g) butter
- ½ cup (120ml) heavy (whipping) cream
- 1 teaspoon (5 ml) vanilla extract
- 1 teaspoon (5 ml) sea salt
- 3 ½ ounces (100g) dark chocolate (70% cocoa)
- 4 ¼ tablespoons (60g) butter
- 2 eggs
- ½ cup (50g) powdered sugar
- One small pinch of salt
- Scant ¼ cup (35g) all-purpose flour
- Salted Caramel Sauce, vanilla ice cream, fresh berries, powdered sugar or cocoa powder (for dusting)
Instructions
- Gather all your ingredients and have them ready by the stove. In a medium-sized, sturdy saucepan with high sides, heat the sugar on medium-high. As it starts to melt, gently stir using a heatproof spatula or whisk to ensure even melting.
- When the sugar is almost completely liquefied and turns amber, incorporate the butter and mix until it’s fully melted. BE CAREFUL: the mixture will bubble up when butter is added.
- Take the pan off the heat and pour in the cream. AGAIN, BE CAREFUL as the mixture will foam up significantly and might splatter. Continue stirring until the caramel is smooth.
- To eliminate any remaining crystals, strain the sauce through a wire sieve into a clean, heatproof container. If desired, add vanilla and salt and mix well.
- As it cools, the caramel sauce will become thicker. Store it in the fridge in a sealed container for up to two weeks. Warm it gently on the stove or in the microwave before serving.
- Set the oven to 350°F (180°C) and grease five muffin molds with butter.
- Melt the chocolate and butter together. For microwaving: break the chocolate into pieces, add the butter, place in a microwave-safe bowl, and heat at 600W for 40 seconds before stirring. Repeat until most of the chocolate is melted, then stir until smooth. For the stove: put the chocolate pieces and butter in a glass or metal bowl and melt over a hot water bath. Remove from heat and let cool.
- In a bowl, whisk the eggs, powdered sugar, and salt with an electric mixer for 1-2 minutes until the mixture is thick and airy. Mix in the cooled chocolate blend. Then, incorporate the flour.
- Evenly distribute the batter into the prepared muffin molds. Each mold should be filled to the top.
- Bake the lava cakes for 7-9 minutes. They are ready when the sides appear dry and firm, while the center remains soft, shiny, and gooey.
- Quickly either flip the lava cakes onto a serving dish or gently remove them using a butter knife or spoon. Serve while warm.
Notes
- Ensure a high-quality dark chocolate with at least 70% cocoa is used for a rich and intense flavor in the lava cakes.
- Whisk eggs, powdered sugar, and salt until thick and airy to achieve a light and fluffy texture in the batter.
- Exercise caution when adding butter to the hot caramel mixture to prevent bubbling and splattering – stir carefully to avoid burns.
- Prep Time: 20 minutes
- Cook Time: 9 minutes
- Category: Dessert
- Method: Baking
- Cuisine: International
Nutrition
- Calories: 350
- Fat: 20g
- Protein: 5g
Keywords: salted caramel, molten chocolate, creamy lava cakes, homemade dessert, sweet and salty, decadent treat
Mastering Salted Caramel Lava Cupcakes
Fundamentals
To create perfect salted caramel lava cupcakes, focus on quality ingredients and precise techniques. The rich, gooey centers are the highlight, achieved by combining dark chocolate, butter, and a touch of sea salt.
Choosing the right chocolate is crucial. Opt for 70% cocoa dark chocolate for a deep, intense flavor. The balance between sweetness and bitterness complements the salted caramel beautifully. Ensure your butter is at room temperature for a smooth, creamy texture.
Preparation/Setup
Start by gathering all your ingredients and having them ready by the stove. This will streamline the cooking process and prevent any mishaps. Grease your muffin molds with butter to ensure easy removal of the cupcakes.
Begin by melting the sugar in a medium-sized, sturdy saucepan. As it turns amber, incorporate the butter, stirring until it melts. Carefully add the cream, allowing the mixture to foam up without splattering. Strain the sauce to remove any crystals, and add vanilla and salt for depth of flavor.
Crafting the Perfect Lava Cake Experience
Technique
The technique for making salted caramel lava cupcakes involves precision and timing. Melt the chocolate and butter together, either using a microwave or a double boiler. Ensure the mixture is smooth and well incorporated before moving on to the next step.
Whisk the eggs, powdered sugar, and salt until thick and airy. The key is to create a light, fluffy batter that will envelop the gooey caramel center. Gently fold in the cooled chocolate mixture, followed by the flour, ensuring a homogenous batter.
Salted Caramel Lava Cupcakes
Tips and Tricks
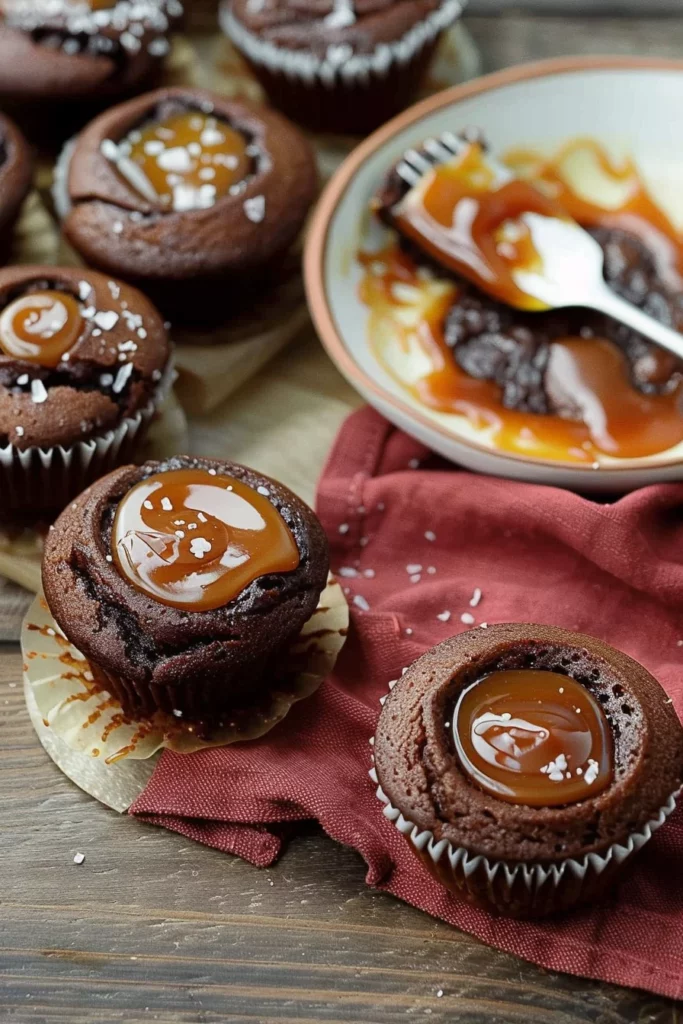
Baking the lava cakes requires careful attention. Fill each muffin mold to the top with batter for a perfect rise. Bake them at 350°F (180°C) for 7-9 minutes. The edges should be firm and dry, while the center remains soft and shiny, indicating the desired gooey texture.
To enhance your lava cake experience, serve them warm. The heat ensures the caramel flows smoothly when cut. For an added flourish, dust with powdered sugar or cocoa powder just before serving.
Elevating Your Baking Game
Perfecting Results
Achieving the perfect salted caramel lava cupcakes requires attention to detail. Consistency in ingredient measurements and baking time ensures a successful outcome every time. Allow the caramel sauce to cool and thicken slightly before using it as a filling.
To take your cupcakes to the next level, consider experimenting with variations. For example, add a hint of peanut butter to the batter for a nutty twist. Alternatively, try incorporating fresh berries into the center for a burst of fruity flavor.
Troubleshooting and Variations
If your lava cakes don’t have the desired gooey center, adjust the baking time. Reducing it by a minute or two can create the perfect molten texture. If the caramel sauce is too thick, gently warm it to achieve a pourable consistency.
For a unique twist, explore different flavor profiles. Incorporate spices like cinnamon or chili powder into the batter for a warm, spicy kick. The possibilities are endless, and each variation adds a new dimension to these classic treats.
Serving and Storing Your Creations
Serving and Presentation
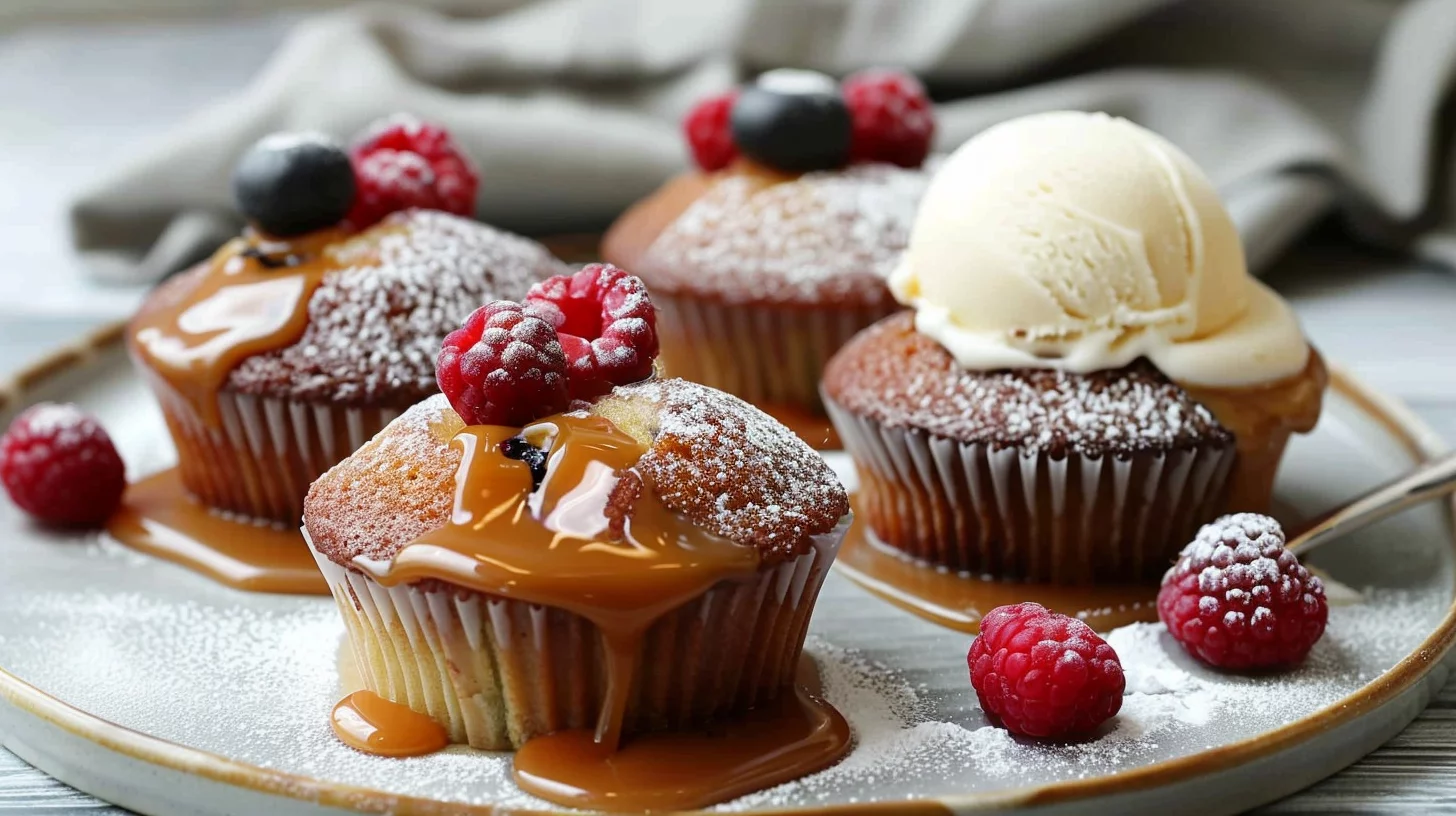
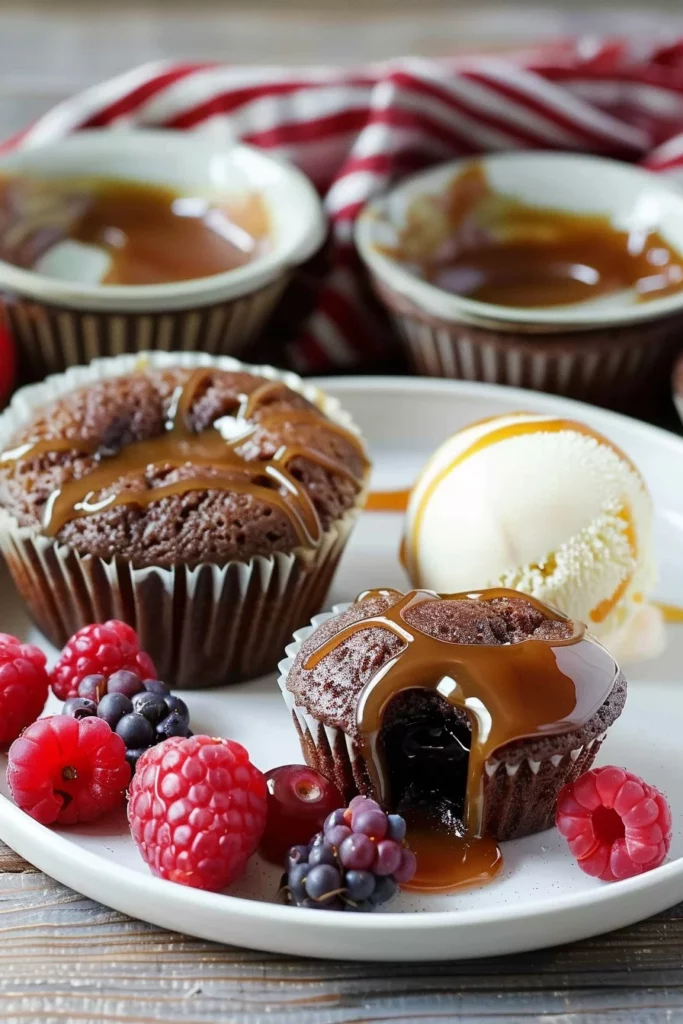
Presentation plays a crucial role in elevating your salted caramel lava cupcakes. Serve them on elegant dessert plates, garnished with a scoop of vanilla ice cream. The contrast between the warm cake and cold ice cream creates a delightful sensory experience.
For a visually appealing touch, drizzle additional salted caramel sauce over the top. Fresh berries add a pop of color and a refreshing element. This simple yet elegant presentation will leave a lasting impression on your guests.
Pairings and Storage
Pair your salted caramel lava cupcakes with a cup of freshly brewed coffee or a steaming mug of hot chocolate. The rich, bold flavors complement the sweetness of the dessert beautifully. For storage, keep any leftover cupcakes in an airtight container in the fridge.
Salted Caramel Lava Cupcakes
Gently reheat them in the microwave before serving to restore the gooey center. These cupcakes can be stored for up to three days, ensuring you can enjoy them at your leisure. The careful balance of flavors and textures make these cupcakes a timeless treat.
Conclusion
Mastering the art of salted caramel lava cupcakes involves mastering the balance of flavors and textures. These cupcakes offer a delightful experience with each bite, showcasing the rich interplay of chocolate and caramel.
The techniques and tips shared in this guide will empower you to create delicious, show-stopping desserts. From preparation to presentation, every step contributes to the creation of a memorable treat.
Whether you’re a seasoned baker or a beginner, these cupcakes are a perfect addition to your culinary repertoire. Their versatility and irresistible flavor profile make them a favorite for any occasion.