
📑 Table of Contents ▶
- The Art of Silky Japanese Custard Pudding
- Fundamentals
- Preparation/Setup
- Directions
- Exploring the Technique Behind Japanese Custard Pudding
- Technique
- Tips and Tricks
- Perfecting Silky Japanese Custard Pudding
- Perfecting Results
- Troubleshooting/Variations
- Serving Silky Japanese Custard Pudding
- Serving/Presentation
- Pairings/Storage
- Related posts:
- Salted Caramel Cookies
- Chocolate Chip Cookie Dough Cups
- SOUTHERN PEACH COBBLER
Silky Japanese Custard Pudding
Making silky Japanese custard pudding requires precision and care, much like crafting a memorable meal that evokes nostalgia and joy. One fond memory revolves around my first encounter with this delightful dessert at a small local café. Each spoonful delivered a velvety texture that melted in my mouth, paired with a delicate sweetness that felt just right.
Exploring how to recreate this pudding at home filled me with excitement. I discovered that the ingredients are simple yet crucial; they transform into something extraordinary. The experience of blending creamy milk with a sprinkle of sugar and gelatin creates a treat that feels both luxurious and comforting.
Japanese custard pudding stands out not just for its flavor but also for its unique texture. The gelatin adds that quintessential jiggle, making it visually appealing and fun to eat. With each attempt to perfect the recipe, my passion for cooking grew deeper, reinforcing the belief that food is truly about connection. This dessert becomes a symbol of shared moments and laughter around the table.
Getting the steps right ensures that you’ll succeed in this culinary endeavor. The whole process—from making the caramel to blending the custard—creates an opportunity for joy and creation. Once you try this recipe, you’ll find that it’s easy to understand why it has a special place in my heart and why it deserves to be part of your dessert repertoire.
The Art of Silky Japanese Custard Pudding
Fundamentals
The foundation of silky Japanese custard pudding lies in the balance of its ingredients. Whole milk and heavy cream offer richness, while the gelatin ensures a smooth consistency that’s neither too firm nor too runny. Understanding how each component contributes to the overall profile enhances the pudding-making experience.
The sweetness comes from white sugar, which blends seamlessly with the milk to create a harmonious flavor. Each element plays a vital role; neglecting one could lead to a disappointing outcome. This dessert invites attention to detail during preparation, encouraging a hands-on approach that emphasizes passion.
When crafting this custard, consider the environment you’re creating. A well-structured workspace will help you appreciate the nuances of each step. Feeling the texture of gelatin as it blooms, savoring the smell of bubbling caramel—each moment enriches the experience.
Preparation/Setup
Gathering your ingredients before starting makes the process much smoother. For this recipe, you need 300 ml of whole milk, 100 ml of heavy cream, and 50 g of white sugar, among others. Arrange everything on your countertop to minimize disruption while you cook.
Start by measuring out the ingredients precisely. This attention to detail enhances the texture and presentation of your pudding. Pouring the whole milk into a microwavable container comes next. Stir it gently with 50 g of white sugar and 7 g of gelatin powder until fully combined.
Allow the gelatin to bloom for 5 to 10 minutes. This step is essential; it determines how well your pudding sets. While the gelatin transforms, use this time to focus on making a beautiful caramel. The caramel will add an exciting contrast to your custard, making each bite a perfect balance of sweetness and texture.
Ingredients
- 50 g white sugar (for the pudding)
- 60 ml water (for making caramel)
- 300 ml whole milk
- 50 g white sugar (for the pudding)
- 7 g gelatin powder
- 3 pasteurized eggs
- 100 ml heavy cream
- ½ tsp vanilla essence
Directions
Starting with 300 ml of whole milk, pour it into a microwavable container. Stir in 50 g of white sugar and 7 g of gelatin powder. Mix thoroughly and set aside, allowing the gelatin to bloom for 5-10 minutes.
While you wait, prepare the caramel. In a small saucepan, combine 60 ml of water with the remaining 50 g of white sugar. Heat on medium until the sugar dissolves and turns a golden brown. Be vigilant; once it reaches this color, remove it from the heat immediately to prevent burning.
Next, move on to the custard. In a separate bowl, beat the three pasteurized eggs, then mix in the bloomed milk, heavy cream, and vanilla essence. Ensure everything blends well, creating a smooth and creamy mixture.
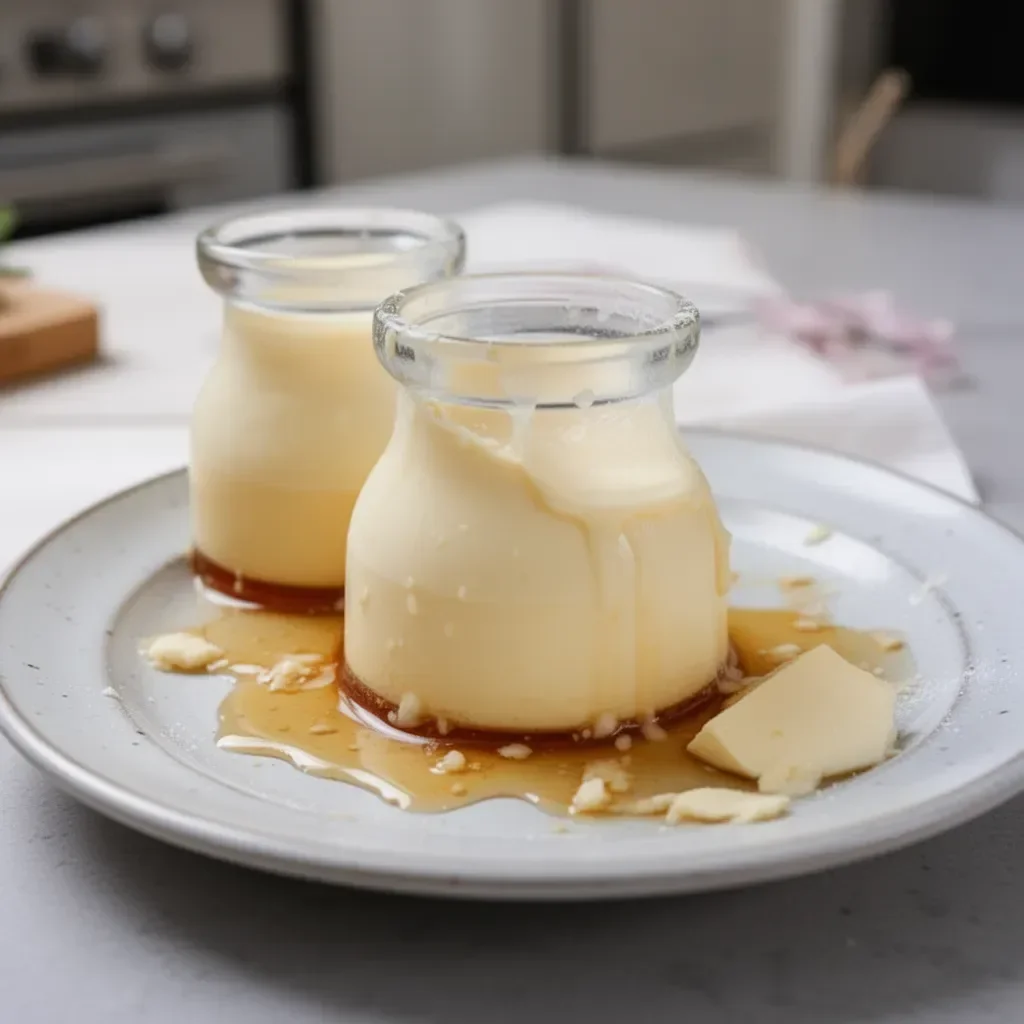
Transfer the pudding mixture into non-stick molds, filling them halfway. First, add a layer of caramel to the bottom of each mold for that beautiful sweetness upon serving.
Set the molds in the refrigerator for at least two to three hours, allowing the custard to set fully. Once ready, gently unmold and serve. The experience of indulging in silky Japanese custard pudding awaits—enjoy every delightful bite!
Exploring the Technique Behind Japanese Custard Pudding
Technique
Crafting silky Japanese custard pudding involves techniques that enhance your confidence in the kitchen. The key starts with the proper blooming of the gelatin. By patiently letting it hydrate, you ensure a smooth final product. This softening creates a pudding that sets just right, maintaining that silky, wobbling texture.
Making caramel can be intimidating, but understanding the heat levels makes all the difference. Using medium heat allows for a gradual change in color, resulting in flawless caramel. Keep your eyes on the saucepan; caramel can shift from golden to burnt in an instant.
Pouring the caramel into the molds before the custard provides a lovely surprise at serving time. As the caramel seeps through the pudding during unmolding, it creates an inviting layer of sweetness on each plate.
Tips and Tricks
To elevate your silky Japanese custard pudding, consider these tips and tricks. First, use a thermometer when making your caramel; it helps in achieving the desired color without risking burning. If you prefer a deeper flavor, experiment with cooking the sugar a bit longer for a richer caramel.
For a fun twist, try incorporating flavors into your custard. Citrus zests can brighten the mixture, while a touch more vanilla essence enhances its aroma. Don’t shy away from adjusting sweetness levels—experiment to find your perfect balance.
Serving this dessert chilled enhances its delightful texture. Allow time for the dessert to relax in the refrigerator, ensuring that each component melds beautifully.
Perfecting Silky Japanese Custard Pudding
Perfecting Results
Perfecting the Japanese custard pudding means focusing on texture. You want a pudding that jiggles but holds its shape nicely. The gelatin’s presence is crucial; too little, and the pudding remains runny. Too much, and it becomes overly firm.
After chilling, gently run a knife around the edges of the molds before unmolding. This technique helps maintain the integrity of the custard and adds a layer of finesse to your serving.
If the pudding isn’t setting as expected, check the gelatin’s activity. Always use fresh gelatin for the best results, as older gelatin may not bloom effectively.
Troubleshooting/Variations
Should you encounter issues during preparation, you can troubleshoot effectively. If your custard doesn’t set properly, reconsider the amount of gelatin used or how well it bloomed. Blooming and mixing thoroughly ensures that nothing settles at the bottom.
For variations, try including alternative flavors such as matcha or coffee. These ingredients can transform the custard pudding into something unique yet equally delightful.
Different molds also provide a fun twist; using small cups or creative shapes can enhance the presentation. Remember, each attempt only brings you closer to your desired pudding perfection.
Serving Silky Japanese Custard Pudding
Serving/Presentation
Pudding is all about presentation as much as it is about flavor. Serve your silky Japanese custard pudding on a simple white plate, allowing the golden caramel to shine. A sprig of mint or a light dusting of powdered sugar can add a lovely touch to the presentation.
Consider pairing the dessert with fresh fruits. Strawberries or berries directly on the plate create a vivid contrast. This not only enhances the visual appeal but also adds a fresh layer of flavor that complements the richness of the pudding.
Pairings/Storage
To keep the pudding fresh, store leftovers in the refrigerator in an airtight container for up to three days. Ensure that the dessert stays covered to maintain moisture and texture.
For a lovely pairing, serve with a cup of rich coffee or fragrant tea. The contrast of flavors enhances the entire dessert experience.
Explore various toppings, such as shaved chocolate or crushed nuts, to elevate your silky Japanese custard pudding even further. Each bite should feel like a reward, ultimately bringing joy into every dining experience.
The journey of creating this delightful dessert brings not only a delectable treat but lasting memories. Embrace the process and enjoy sharing it with others around your table.
Print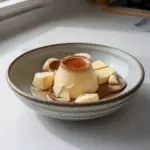
Silky Japanese Custard Pudding
- Total Time: 60 minutes
- Yield: 4 servings 1x
- Diet: Vegetarian
Description
A delightful and nostalgic dessert featuring a velvety texture and delicate sweetness, perfect for sharing with loved ones.
Ingredients
- 50 g white sugar (for the pudding)
- 60 ml water (for making caramel)
- 300 ml whole milk
- 50 g white sugar (for the pudding)
- 7 g gelatin powder
- 3 pasteurized eggs
- 100 ml heavy cream
- ½ tsp vanilla essence
Instructions
- Starting with 300 ml of whole milk, pour it into a microwavable container. Stir in 50 g of white sugar and 7 g of gelatin powder. Mix thoroughly and set aside, allowing the gelatin to bloom for 5-10 minutes.
- While you wait, prepare the caramel. In a small saucepan, combine 60 ml of water with the remaining 50 g of white sugar. Heat on medium until the sugar dissolves and turns a golden brown. Be vigilant; once it reaches this color, remove it from the heat immediately to prevent burning.
- Next, move on to the custard. In a separate bowl, beat the three pasteurized eggs, then mix in the bloomed milk, heavy cream, and vanilla essence. Ensure everything blends well, creating a smooth and creamy mixture.
- Transfer the pudding mixture into non-stick molds, filling them halfway. First, add a layer of caramel to the bottom of each mold for that beautiful sweetness upon serving.
- Set the molds in the refrigerator for at least two to three hours, allowing the custard to set fully. Once ready, gently unmold and serve.
Notes
To enhance the pudding’s flavor, consider adding citrus zests or adjusting sweetness levels to your preference.
- Prep Time: 15 minutes
- Cook Time: 15 minutes
- Category: Dessert
- Method: Refrigeration
- Cuisine: Japanese
Nutrition
- Serving Size: 1 serving
- Calories: 250
- Sugar: 20g
- Sodium: 75mg
- Fat: 10g
- Saturated Fat: 6g
- Unsaturated Fat: 3g
- Trans Fat: 0g
- Carbohydrates: 30g
- Fiber: 0g
- Protein: 6g
- Cholesterol: 150mg
Keywords: Japanese custard pudding, dessert, silky pudding, caramel dessert, custard