
📑 Table of Contents ▶
- Cotton Candy Cookies: Basics of Baking
- Fundamentals
- Preparation and Setup
- Directions
- Making Cotton Candy Cookies: Techniques and Tricks
- Technique
- Tips and Tricks
- Mastering Cotton Candy Cookies
- Perfecting Results
- Troubleshooting and Variations
- Serving and Enjoying Cotton Candy Cookies
- Presentation
- Pairings and Storage
- Related posts:
- The World's Best Banana Bread Recipe: Heavenly Banana Bliss in Every Bite
- Apple Crisp Mini Cheesecakes
- Beet and Apple Salad with Blue Cheese Hazelnuts: The Ultimate Recipe
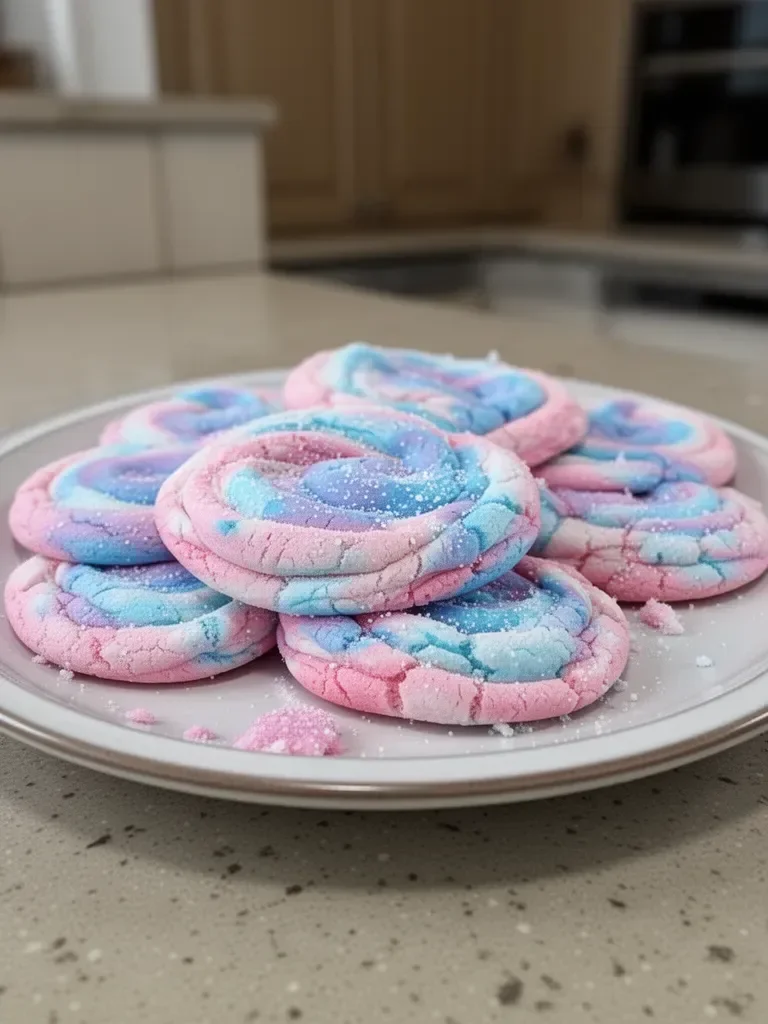
Cotton Candy Cookies Recipe – Fun & Colorful Treats
Creating vibrant, delicious cookies brings back fond memories of childhood fairs and summer days filled with laughter. There’s something magical about the sweet aroma of cotton candy wafting through the air, and now you can capture that nostalgia in a cookie form! Cotton candy cookies combine the whimsical flavors and colors of these fluffy treats with the comforting essence of homemade baking.
Gathering in the kitchen, experimenting with colors, and tasting the sweet dough is a joyous experience. These cotton candy cookies not only satisfy your sweet tooth but also brighten up any gathering with their delightful hues of pink and blue. As you mix, roll, and bake, you’ll feel the infectious excitement that comes from crafting something truly special.
Let’s dive into this fun and colorful culinary adventure. Cotton candy cookies are all about bringing joy, creativity, and a hint of nostalgia into your baking. Embark on this journey to create these precious treats that everyone will adore.
Cotton Candy Cookies: Basics of Baking
Fundamentals
Before you embark on making your cotton candy cookies, familiarizing yourself with the basics of the recipe is crucial. Understanding each ingredient and its role will ensure the end product is nothing short of delightful. For this task, 2 1/2 cups of all-purpose flour serve as the backbone of the cookie, providing structure and stability. Granulated sugar, measured at 1 cup, adds the necessary sweetness, while 1/2 teaspoon of baking powder and 1/4 teaspoon of baking soda together help create that perfect rise.
A sprinkle of 1/4 teaspoon salt balances the sweetness, bringing out the flavor beautifully. Remember to use softened unsalted butter; 1/2 cup will ensure a rich and creamy texture. To enhance the cookie’s flavor and moisture, incorporate 1/4 cup of buttermilk or its substitute if needed. A large egg, accompanied by 1 teaspoon of vanilla extract, enriches the taste and binds the ingredients. Finally, the real magic unfolds with gel food coloring—pink and blue—to create visually stunning cookies, and cotton candy flavoring to evoke that familiar, whimsical taste.
Preparation and Setup
Preparing your kitchen is the first step. Begin by preheating your oven to 350°F (175°C). It ensures a perfectly baked cookie right out of the gate. Line two baking sheets with parchment paper, which saves you a headache later during cleanup and prevents sticking.
Gather your ingredients, measuring them correctly. Precision is vital in baking; it helps achieve the desired texture and flavor. As you set the stage, remember that baking is a science, and following the steps closely leads to the best results.
Clear off your kitchen counter space to create a comfortable working area, keeping mixing bowls and utensils at hand. Whisking dry ingredients together in one bowl makes for an effortless process, while another bowl will hold the creamed butter and sugar mixture. Having everything organized and ready minimizes potential chaos, letting you focus on the fun of baking.
Ingredients
Here’s a quick rundown of everything you need to create these eye-catching cotton candy cookies:
- 2 1/2 cups all-purpose flour
- 1 cup granulated sugar
- 1/2 teaspoon baking powder
- 1/4 teaspoon baking soda
- 1/4 teaspoon salt
- 1/2 cup unsalted butter, softened
- 1/4 cup buttermilk (or substitute with 1/4 cup milk mixed with 1 teaspoon lemon juice or vinegar)
- 1 large egg
- 1 teaspoon vanilla extract
- Gel food coloring (pink and blue)
- Cotton candy flavoring (optional)
Make sure to have all these items on hand before starting.
Directions
- Preheat the oven to 350°F (175°C).
- In a mixing bowl, combine the flour, baking powder, baking soda, and salt. Stir well and set it aside.
- In another bowl, cream together the softened butter and granulated sugar until the mixture becomes light and fluffy. This process usually takes about 3 to 5 minutes with a hand mixer or stand mixer.
- Add the egg, vanilla extract, and buttermilk to the butter-sugar mixture. Blend until combined.
- Gradually add the dry ingredient mixture into the wet ingredients, stirring until just combined.
- Divide the dough into two equal parts. Add pink gel food coloring to one half and blue gel food coloring to the other half. Mix them well to achieve your desired colors.
- Using your hands, form small balls from each colored dough, giving each cookie a playful swirl of color as you combine the two.
- Place the cookie balls onto your baking sheets, spacing them about 2 inches apart.
- Bake for 10-12 minutes, or until the edges turn lightly golden.
- Allow the cookies to cool on the baking sheets for a few minutes before transferring them to a wire rack to cool completely.
Making Cotton Candy Cookies: Techniques and Tricks
Technique
Perfecting your technique can elevate your cookie game. When mixing butter and sugar, ensure the butter reaches the perfect softness—not melted, just soft enough for easy creaming. This crucial step creates that light and airy texture everyone loves in cookies.
Mix in your egg and buttermilk until just combined. Overmixing at this stage can lead to dense cookies, so handle the dough gently. When adding the dry ingredients, stirring too vigorously can also create tough cookies; gently fold until the flour disappears.
Dividing and coloring the dough adds a playful element, and it’s important to wear gloves when handling gel food coloring. This prevents your hands from turning an unnatural shade if you prefer to avoid color stains. Roll the dough into fun, colorful shapes that will impress when your guests see the final product!
Tips and Tricks
- Experiment with different colors: If you want a more pastel look, use less food coloring.
- Add cotton candy flavoring to the dough for an extra touch of nostalgia. A little goes a long way!
- Chill the dough in the fridge for about 30 minutes before baking to prevent spreading. This method helps the cookies hold their shape even better when baked.
- Use a cookie scoop to ensure uniform cookie sizes. They consistently bake evenly and look great on a platter.
- Top with sprinkles before baking for an extra celebratory touch; they add whimsy and texture.
Mastering Cotton Candy Cookies
Perfecting Results
To achieve perfectly baked cookies, keep an eye on time and temperature. Every oven behaves differently, so checking cookies at the lower end of the baking time (10 minutes) will help you avoid overbaking. Look for slight golden edges and a soft center; they will continue to cook slightly as they cool.
Cooling the cookies on the baking sheet for a few minutes is essential for setting the shape. Once transferred to a wire rack, let them cool completely to prevent any sogginess.
Troubleshooting and Variations
Should your cookies turn out differently than expected, don’t fret! If they spread too much, make sure your butter is softened, not melted. A well-measured flour amount and properly chilled dough also assist in keeping shapes intact.
For variations, consider adding sprinkles, different flavored extracts, or swapping out the cotton candy flavoring for something unique like bubblegum or vanilla. Not only can you adjust the colors, but you can also create fun, seasonal variations as well!
Serving and Enjoying Cotton Candy Cookies
Presentation
Presentation elevates the delightful experience of these cookies. Arrange them on a colorful platter or in a whimsical cookie jar. Stack them high for a tower of fun, or place a few on plates next to drinks for an adorable treat at gatherings.
Consider adding whimsical decorations or themed elements that match the colors of the cookies. Use cocktail umbrellas, edible glitter, or cotton candy-flavored sprinkles to give your treats a festive flare—perfect for birthdays, school events, or family get-togethers.
Pairings and Storage
While these cotton candy cookies shine on their own, they pair wonderfully with milk, hot chocolate, or a refreshing iced beverage. The sweet flavors complement these beverages, creating a nostalgic, comforting experience.
Store the cookies in an airtight container at room temperature for up to a week. If you want them to last longer, consider freezing them. Just layer the cookies between parchment paper in a freezer-safe bag or container. When you’re ready for a sweet treat, let them thaw at room temperature or warm them slightly in the microwave.
Creating these whimsical cotton candy cookies will bring smiles and childhood nostalgia to your kitchen. Every bite drizzles with sweet memories that delight young and old alike. Happy baking!
Print
Cotton Candy Cookies
- Total Time: 27 minutes
- Yield: 24 cookies 1x
- Diet: Vegetarian
Description
Delightful and colorful cookies inspired by the flavors of cotton candy, perfect for brightening up any gathering.
Ingredients
- 2 1/2 cups all-purpose flour
- 1 cup granulated sugar
- 1/2 teaspoon baking powder
- 1/4 teaspoon baking soda
- 1/4 teaspoon salt
- 1/2 cup unsalted butter, softened
- 1/4 cup buttermilk (or substitute with 1/4 cup milk mixed with 1 teaspoon lemon juice or vinegar)
- 1 large egg
- 1 teaspoon vanilla extract
- Gel food coloring (pink and blue)
- Cotton candy flavoring (optional)
Instructions
- Preheat the oven to 350°F (175°C).
- Combine the flour, baking powder, baking soda, and salt in a mixing bowl. Stir well and set it aside.
- Cream together the softened butter and granulated sugar until light and fluffy, about 3 to 5 minutes.
- Add the egg, vanilla extract, and buttermilk to the butter-sugar mixture. Blend until combined.
- Gradually add the dry ingredient mixture into the wet ingredients, stirring until just combined.
- Divide the dough into two equal parts. Mix pink gel food coloring into one half and blue into the other.
- Form small balls from each colored dough, creating a swirl when combining.
- Place the cookie balls on baking sheets, spaced about 2 inches apart.
- Bake for 10-12 minutes, or until edges are lightly golden.
- Cool on the baking sheets for a few minutes before transferring to a wire rack to cool completely.
Notes
For a pastel look, use less food coloring. Chill the dough for 30 minutes before baking for better shape.
- Prep Time: 15 minutes
- Cook Time: 12 minutes
- Category: Dessert
- Method: Baking
- Cuisine: American
Nutrition
- Serving Size: 1 cookie
- Calories: 150
- Sugar: 10g
- Sodium: 100mg
- Fat: 6g
- Saturated Fat: 4g
- Unsaturated Fat: 2g
- Trans Fat: 0g
- Carbohydrates: 23g
- Fiber: 0g
- Protein: 1g
- Cholesterol: 20mg
Keywords: cookies, cotton candy, dessert, colorful treats, baking