📑 Table of Contents ▶
- Emojicloud Pastel Cloud Bread
- Creating Emojicloud Pastel Cloud Bread
- Fundamentals
- Preparation/setup
- Crafting the Perfect Meringue
- Technique
- Tips/tricks
- Mastering Emojicloud Pastel Cloud Bread
- Perfecting results
- Troubleshooting/variations
- Presenting Your Emojicloud Pastel Cloud Bread
- Serving/presentation
- Pairings/storage
- Conclusion
- FAQs – Emojicloud Pastel Cloud Bread
- Related posts:
- Sweet and Spiced Applesauce Cake: Ultimate Fall Treat
- Gluten-Free Pumpkin Squares (Bars)
- Quick and Simple Donut Recipe: How to Satisfy Your Cravings Fast
I still remember the first time I made Emojicloud Pastel Cloud Bread. It was a rainy afternoon, and the kids were feeling restless. I wanted to create something that would bring a little bit of sunshine into our day. As I whisked the egg whites into fluffy peaks, the kitchen filled with a sense of magic and anticipation.
The vibrant colors of the gel food coloring added a whimsical touch, making the Emojicloud Pastel Cloud Bread feel like a playful escape from the gloomy weather outside. Watching the meringue transform into a pastel masterpiece was like watching a painter bring a canvas to life. This simple yet enchanting creation quickly became a family favorite, perfect for brightening any day.
At GrandMmaDelights, I aim to make every recipe an experience, a moment to savor and share. Emojicloud Pastel Cloud Bread embodies this philosophy, turning humble ingredients into a delightful treat. This recipe isn’t just about baking; it’s about creating memories and sharing smiles with those you love. Let’s dive into this colorful adventure and discover the joy of making Emojicloud Pastel Cloud Bread together.

Emojicloud Pastel Cloud Bread
- Total Time: 40-45 minutes
- Yield: 1 loaf 1x
Description
Discover how to make Emojicloud Pastel Cloud Bread with our easy-to-follow recipe. Create a fluffy and colorful treat that’s perfect for any occasion!
Ingredients
- 3 egg whites (large)
- 2 1/2 tbsp (37 ml) granulated sugar
- 1 tbsp (15 ml) cornstarch
- Gel Food Coloring (pink and blue)
- Sprinkles
Instructions
- Preheat your oven to 300°F and prepare a baking tray with parchment paper.
- In a large mixing bowl or the bowl of your stand mixer, beat the egg whites until they become bubbly.
- Slowly incorporate the sugar. Then, sift the cornstarch into the mixture.
- Continue beating at high speed until the mixture transforms into a shiny, thick meringue that forms stiff peaks, approximately 5 minutes. Be careful not to overbeat.
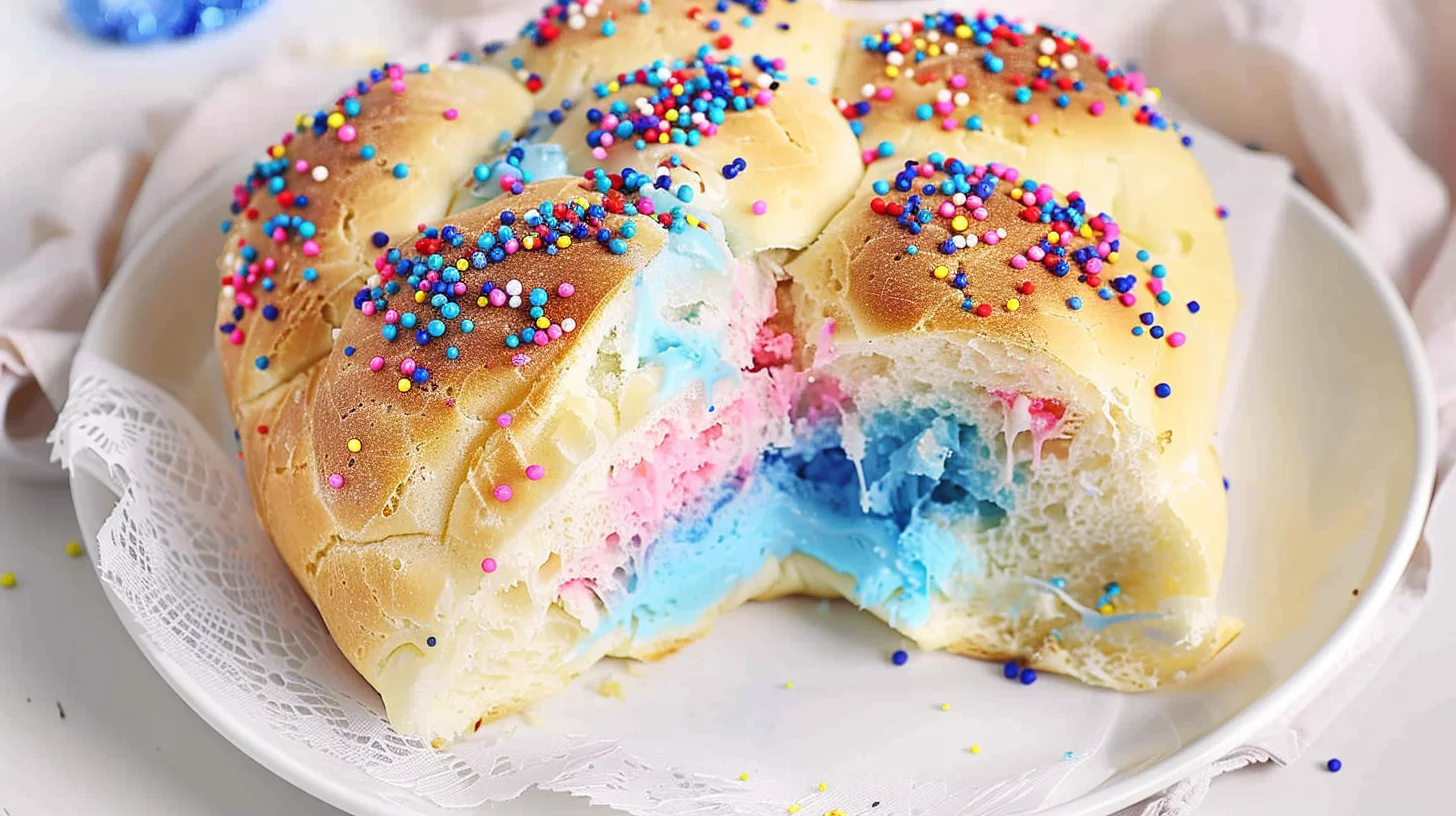
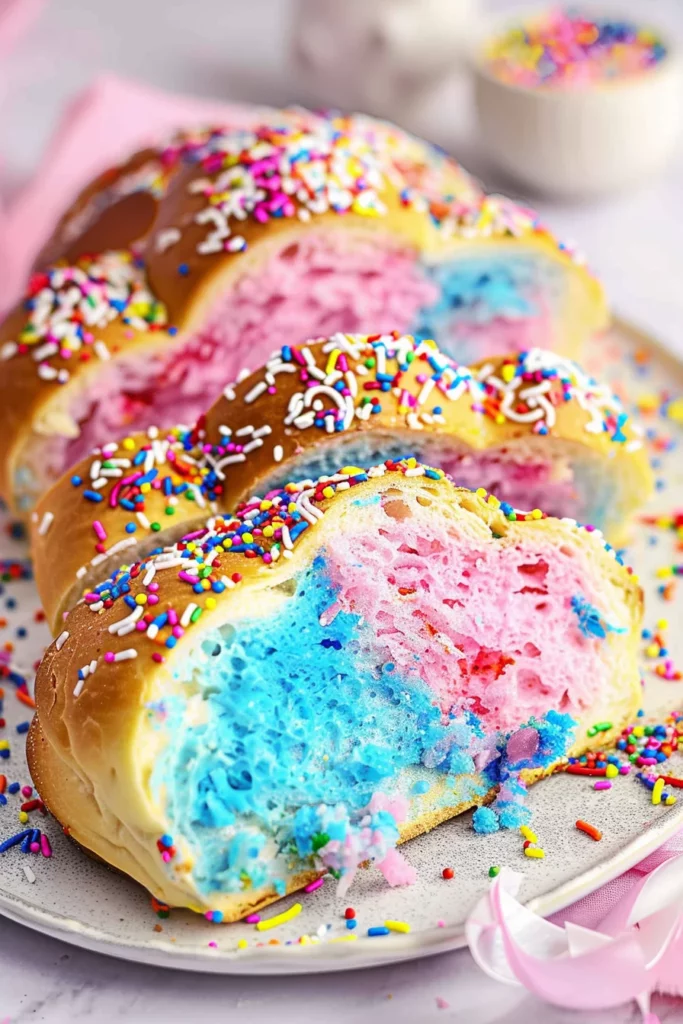
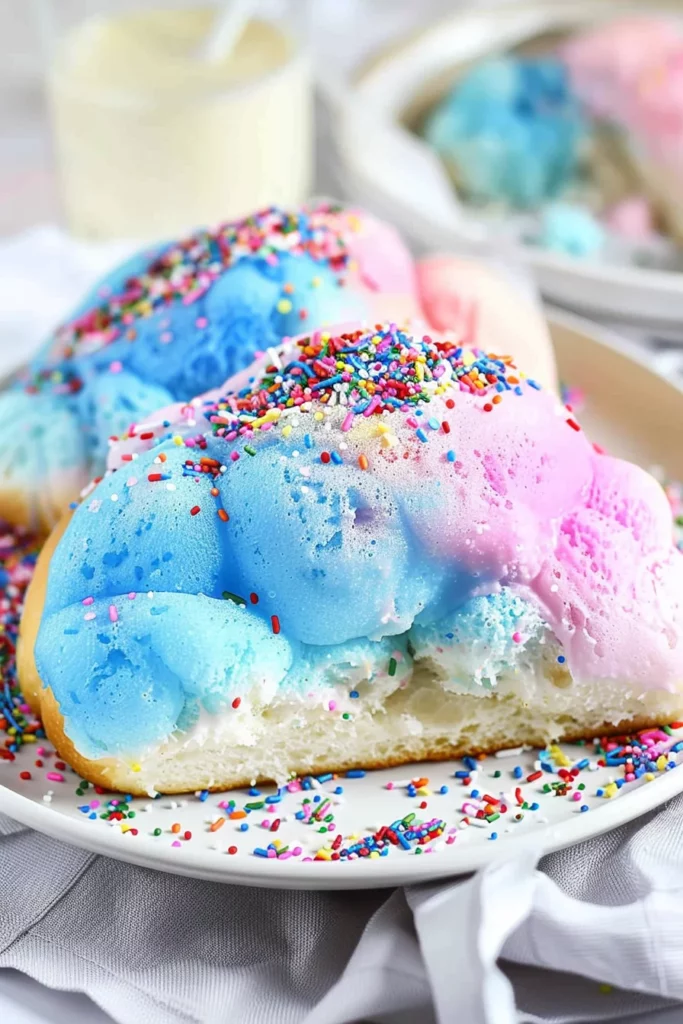
- Add a few drops of gel food coloring to achieve your desired brightness. You can divide the meringue into two separate bowls to use different colors. Optionally, introduce a drop or two of flavoring.
- Spoon the meringue onto the baking tray covered with parchment paper and mold it into a rounded loaf form. Sprinkle the top with sprinkles.
- Bake for 25-30 minutes until the surface shows a light golden color. Allow it to cool before gently removing it from the parchment paper.
Notes
- – Remember to sift the cornstarch into the egg white mixture to ensure a smooth meringue.
- – Opt for gel food coloring for a vibrant and consistent hue in your meringue.
- – If desired, enhance the flavor of the meringue by adding a drop or two of flavoring.
- Prep Time: 15 minutes
- Cook Time: 25-30 minutes
- Category: Dessert
- Method: Baking
- Cuisine: N/A
Nutrition
- Calories: N/A
- Fat: N/A
- Protein: 3 egg whites
Keywords: 1. Meringue recipe, 2. Colorful meringue, 3. Whipped meringue, 4. Baked meringue, 5. Egg white dessert, 6. Sprinkle meringue
Creating Emojicloud Pastel Cloud Bread
Fundamentals
Creating Emojicloud Pastel Cloud Bread starts with understanding its core ingredients and their purpose. The egg whites serve as the foundation, providing structure and volume. When beaten, they transform into a fluffy meringue, giving the bread its signature cloud-like texture. The granulated sugar sweetens the loaf while stabilizing the meringue, ensuring it holds its shape during baking.
Cornstarch plays a crucial role in achieving the desired consistency. It acts as a thickening agent, helping the meringue maintain its form. The gel food coloring adds a playful, pastel hue, making the bread visually appealing. Sprinkles provide a finishing touch, adding a dash of fun and whimsy. Understanding these basics lays the groundwork for creating a successful Emojicloud Pastel Cloud Bread.
Preparation/setup
Before diving into the preparation, gather your ingredients and preheat your oven to 300°F. Line a baking tray with parchment paper to prevent sticking and ensure easy removal of the bread once baked. In a large mixing bowl or stand mixer, start beating the egg whites until they become bubbly. Gradually add the granulated sugar, allowing it to dissolve into the mixture.
Next, sift the cornstarch into the bowl, continuing to beat the mixture at high speed. This process will transform the egg whites into a shiny, thick meringue with stiff peaks. Be cautious not to overbeat, as this can lead to a grainy texture. Divide the meringue into separate bowls if you wish to use multiple colors. Add a few drops of gel food coloring to each bowl, mixing until you achieve the desired shade.
Crafting the Perfect Meringue
Technique
Achieving the ideal meringue texture requires technique and attention to detail. Begin by ensuring your mixing bowl and beaters are clean and free of any grease, as this can interfere with the egg whites’ ability to form peaks. When beating the egg whites, start at a low speed to create small, uniform bubbles. Gradually increase the speed to high, allowing the mixture to thicken gradually.
Incorporate the sugar slowly, adding a tablespoon at a time and allowing it to dissolve completely before adding more. This gradual process ensures a smooth, glossy meringue. Once the sugar is fully incorporated, sift in the cornstarch, which helps stabilize the mixture. Continue beating until the meringue forms stiff peaks, indicating it’s ready for coloring and shaping.
Emojicloud Pastel Cloud Bread
Tips/tricks
To perfect your Emojicloud Pastel Cloud Bread, keep a few tips in mind. Always use room temperature egg whites, as they whip more easily and result in a fluffier meringue. If you have time, let the egg whites sit out for about 30 minutes before starting. When adding gel food coloring, start with a small amount and gradually increase until you reach the desired hue.
Experiment with different color combinations to create unique effects. You can gently swirl two colors together for a marbled look or create distinct layers by spooning different colors side by side. If you’re new to meringue-making, practice patience and avoid rushing through the process. With practice, you’ll develop a feel for the right consistency and timing.
Mastering Emojicloud Pastel Cloud Bread
Perfecting results
Achieving perfect Emojicloud Pastel Cloud Bread involves more than just technique; it’s about getting the details right. When spooning the meringue onto the baking tray, aim for a rounded loaf shape. This form ensures even baking and an aesthetically pleasing result. Sprinkle the top with your favorite sprinkles, pressing them gently into the meringue to adhere.
Bake the bread for 25-30 minutes, keeping a close eye on it to prevent overbaking. The surface should turn a light golden color. Once baked, allow the bread to cool completely before removing it from the parchment paper. This cooling period helps the meringue set, making it easier to handle without cracking.
Troubleshooting/variations
Even seasoned bakers encounter challenges, but troubleshooting can help you achieve the perfect Emojicloud Pastel Cloud Bread. If your meringue appears grainy, it may be overbeaten. In this case, start fresh with new egg whites, ensuring you beat them just until stiff peaks form. If the meringue doesn’t hold its shape, it might be underbeaten, so continue beating until firmer peaks develop.
For a fun variation, consider adding a drop or two of flavoring to the meringue. Vanilla, almond, or lemon extract can enhance the bread’s taste without altering its structure. Additionally, you can experiment with different sprinkle types, from classic rainbow to themed shapes, to match various occasions or seasons.
Presenting Your Emojicloud Pastel Cloud Bread
Serving/presentation
Presentation is key when serving Emojicloud Pastel Cloud Bread. Its vibrant colors and whimsical design make it an eye-catching centerpiece. Arrange the loaf on a decorative platter or cake stand to showcase its beauty. For an added touch, sprinkle a few extra sprinkles around the base or garnish with fresh flowers.
This delightful bread pairs wonderfully with a variety of accompaniments. Serve it alongside a fresh fruit platter for a light, refreshing contrast. Alternatively, pair it with a scoop of ice cream or a dollop of whipped cream for a decadent dessert. Emojicloud Pastel Cloud Bread is versatile and can be enjoyed at any time of day.
Emojicloud Pastel Cloud Bread
Pairings/storage
While Emojicloud Pastel Cloud Bread is delightful on its own, pairing it with complementary flavors can enhance the experience. Consider serving it with a fruit compote or a drizzle of chocolate syrup for added richness. If you need to store leftovers, place the bread in an airtight container to maintain its freshness. Store it at room temperature for up to two days.
If you’re interested in more cloud bread variations, explore our Cloud Bread and Cloud Soft Homemade Bread. For a savory twist, check out our Cauliflower Cloud Bread Delight. These recipes offer unique takes on the classic cloud bread, providing endless possibilities to enjoy.
Conclusion
Emojicloud Pastel Cloud Bread embodies the joy of baking with its vibrant colors and fluffy texture. This recipe transforms simple ingredients into a delightful treat that brings smiles to any gathering. The process of creating this whimsical bread offers an opportunity to experiment and express creativity in the kitchen.
The key takeaways include mastering the meringue technique, experimenting with colors and flavors, and presenting the bread beautifully. Emojicloud Pastel Cloud Bread is not only a feast for the eyes but also a testament to the magic of home cooking. By following these steps, you’ll create a memorable experience to share with family and friends, making each slice a celebration of culinary artistry.